We tell you the step by step to make a homemade blackboard for children or to decorate and give your house a wave. A simple, economical and comforting task.
For your children to play or to decorate a wall and give a cool touch to an environment, we will tell you how to make a blackboard with your own hands. Investing little money and a handful of hours, you can manufacture it in a super simple way and with the measures that perfectly fit your space.
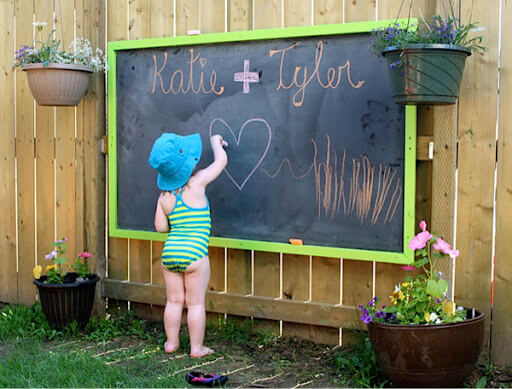
It can be a very pleasant surprise if you have children or grandchildren. Kids love having a blackboard where they can draw and erase a thousand times and it can be the trigger for super fun games.
Additionally, chalkboards have become a fashionable decorative object in recent years. They put a lot of fun in the kitchen, the playrooms or the work corners. Dare to explore the universe of crafts, a true one-way trip.
How to make a blackboard step by step
Table of Contents
A homemade chalkboard is actually very easy to make. To save yourself work, you can use an old frame that you have at home or make one to measure without inconvenience. In this case, we share the example of a 55 x 80 centimeter blackboard, but you can make it the size you want by scaling the amount of materials.
Materials:
For the frame:
- 4 wooden rods 50 cm long x 2.5 cm wide x 2 cm thick.
- 2 wooden sticks 80 cm long x 2.5 cm wide x 2 cm thick.
- 1 x 3mm MDF plate measuring 80cm x 55cm.
For the Frame:
- 2 wooden sticks 81 cm long x 3.5 cm wide x 7 mm thick.
- 2 wooden rods 56 cm long x 3.5 cm wide x 7 mm thick.
For the blackboard
- Blackboard paint (the color you want).
- Brush number 10.
- Carpenter’s tail.
- Brush to apply glue.
- 2 ” Self Drilling Wood Screws.
- 32 nails of 3/4.
- Paint for the frame (the color you want).
- Fine-grained sandpaper
Procedure: how to make a blackboard
- The first step is to acquire the woods of the frame of the required measure. You can ask to have these strips cut or cut yourself with a handsaw or, better yet, a circular saw.
- Once you have the frame timbers, you have to join them together. To do this, it is best to square them correctly with a rule at 90 degrees and join them with carpentry glue and self-drilling screws. It is advisable to first take the vertical woods of the frame (those of 50 cm) and, with a hole punch, make the holes where the self-drilling will go later. You can use a socket guide, like the Kreg Jig Mini, so that the holes are at 45 degrees.
- When you have ready the frame with its 4 joined sides, then you must complete this task by placing with glue and self-drilling screws the two remaining pieces of wood of 50 cm long x 2.5 wide x 2 cm thick, distributed along the of 80. That way, you will have a frame modulated in three parts.
- In the same way as at the beginning, you can ask the lumber or carpentry to cut the MDF plate of the mentioned measure or do it yourself if you have the saw.
- Next, you must apply the carpenter’s glue with a brush on the upper face of the 4 edges of the hoop and the two central poles. Also apply carpenter’s glue to the spaces in the MDF board that will be leaning against the frame.
- Next, you will have to join the MDF plate with the frame. To get these two parts together, complete the task by nailing the board to the frame. Use cla nails on the edges of the board. You can put approximately three for each vertical side (55 cm) and 5 for each horizontal side (80 cm).
- Before continuing, take a damp cloth and remove any excess glue that may have remained.
- Next, we begin with the painting of the plate. Take the chalkboard polish and apply a first coat. Let dry for an hour and give it a second coat. I repeated this operation until completing 4 enamel coats.
- It was time to place the frame. First, take the 4 rods of 7 mm thick (make sure they are brushed) and paint them the color you want. You can also varnish them. Then attach them by nail and glue to the outside edges of the board. It would be ideal if you can cut them or have them cut in the carpentry mitered at 45 degrees at the edges so that they are perfectly joined.
- To finish the task, sand the edges of the board, trying to remove any chips or imperfections that may remain. And voila, your work is done!
Chalkboard paint
Buying a blackboard enamel you can create a blackboard on different surfaces and aligned with the design of any environment. More and more paint brands offer these specific products and they turn out super good. It is a paint specially developed to allow writing with chalk and easy erasure, and it has great resistance to scratching and rubbing.
Slate paint -this it is called- is usually versatile and can be applied on wood, chipboard, mdf, hardboard, metals and, also, on masonry, previously using the appropriate primer.
How to make a white board
The procedure for assembling a white board is exactly the same that we tell you that you must follow to make a black board . The only thing you have to change is the color of the nail polish you buy. In these cases, it is important to buy quality products that are super washable.
Do not forget to find out well with what type of chalk or markers you can write on these types of paintings so as not to ruin your work. It looks great when you combine one of the ends with a cork plate, where you can put photos, annotations and more. It is fashionable and adds a cool touch that can totally refresh an environment.