

Spring cleaning is a great way to freshen up your kitchen and give it a new, organized look. It’s the perfect opportunity to eliminate clutter and create more space for new items. While spring cleaning your kitchen can be overwhelming, it doesn’t have to be.
With a few simple tips, you can quickly and easily get your kitchen back in order, making it sparkling and organized. From decluttering your pantry to scrubbing down your beautiful stained cabinets, there are many tasks that you can complete to make your kitchen look and feel brand new.
1. Sort Through and Organize Your Pantry
Table of Contents
Sorting through and organizing your pantry can be daunting, but it’s essential to spring cleaning. Here are some tips for organizing your pantry:
- Remove everything from the pantry and wipe down the shelves. This is a great time to get rid of any expired food items.
- Sort the items into categories such as canned goods, grains, snacks and baking supplies.
- Find storage solutions for each of the categories. These can include airtight containers or labeled bins to keep items organized.
- Place the items in the pantry according to your categories. Put the most frequently used items at eye level, and place the items used less often on the top or bottom shelves.
- Label each shelf according to its contents. This will help you find items quickly and keep the pantry organized.
- Take inventory of the items in the pantry periodically. When you do this, you can easily track what you need to restock and organize the pantry.
2. Declutter Your Counters and Cabinets
By taking the time to declutter your kitchen counters and cabinets, you can make your kitchen more efficient and enjoyable to use.
To get started, clear off your countertops by removing any appliances or items that take up space or are not used regularly. This will give you a blank slate to work with. Then, sort through your wholesale cabinets and drawers, removing expired, broken or unused items. While you’re at it, have a trash bag handy for throwing away anything you don’t need.
Once the clutter is out, it’s time to reorganize your cabinets and drawers. Group items together by category, such as all your baking supplies in one drawer and your cooking utensils in another. This will make it easier to find items when you need them.
Additionally, use bins and containers to keep small items, like spices and canned goods, organized and easy to access. Finally, use cabinet organizers or lazy susans to maximize the space in your cabinets and make them easier to navigate.
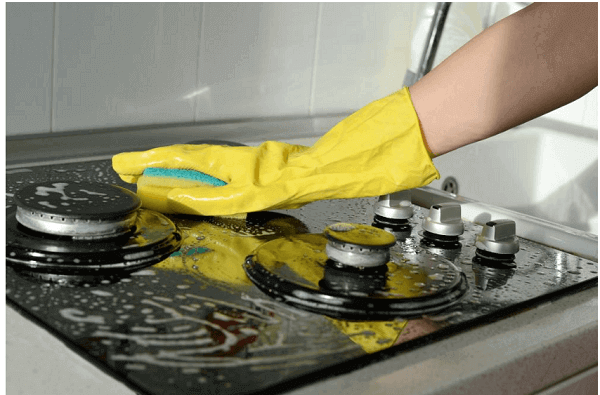
3. Deep Clean Your Kitchen Appliances
Spring cleaning your kitchen should include deep cleaning your kitchen appliances. It includes the inside and outside of the appliances, such as the refrigerator, microwave, dishwasher and oven.
For the refrigerator, it is essential to clear out the shelves and drawers, removing any expired or old food. Then, use a mild detergent to wipe down the shelves and drawers. The vents and coils behind the refrigerator must be cleaned, too, as debris and dust can collect and interfere with the circulating cool air.
It is vital to clean the microwave interior, where food can splatter and build up over time. Use mild detergent and a damp cloth to wipe down the walls, ceiling and microwave floor. This will also help eliminate any unpleasant odors.
Remove the racks of the oven and soak them in hot soapy water. Then, spray the oven interior with an oven cleaner, and let it sit for about 10 minutes. After that, use a damp cloth to wipe down the oven’s interior, including the walls, ceiling and door. Finally, wipe down the outside of the oven.
The dishwasher also needs periodic deep cleaning. Start by removing any residue from the filter and wiping down the interior with a mild detergent and a damp cloth. Then, run the dishwasher with a dishwasher cleaner. It will help remove any buildup of soap scum and food residue.
4. Wipe the Walls and Ceiling
Wiping down your walls and cleaning your ceiling can remove dust, dirt and grime from these surfaces and make your kitchen look and feel fresher and more organized. Start by dusting off any cobwebs or visible dirt from the walls and ceiling. Then use a clean, lint-free rag dampened with a mild all-purpose cleaner or warm soapy water to wipe down the walls and ceiling.
Pay special attention to the areas around light fixtures, where accumulated dust and dirt can cause discoloration or damage. For the ceiling, use an extendable duster or a vacuum with a brush attachment to help reach those hard-to-get areas. After cleaning, dry the walls and ceilings with a clean cloth to prevent streaks from forming.
5. Clean Your Kitchen Floor
The kitchen floor is exposed to a lot of dirt and grime every day, so it’s important to scrub it thoroughly. However, if you have vinyl plank flooring in your kitchen, you don’t have to worry much because it’s easy to clean and maintain and waterproof.
Start by vacuuming or sweeping away any dirt, debris or crumbs. It will make the job easier and ensure you don’t spread extra dirt while cleaning. Use a mop and warm, soapy water to clean the floor. Focus on stubborn spots, and rinse the mop after each section to avoid pushing dirt around. Then, use a scrub brush to clean the corners and crevices of the kitchen floor. This will remove any stubborn dirt or grime missed when mopping. Once you’ve cleaned the floor, rinse it with clean water to ensure any soap residue is removed.
6. Organize Your Utensils
Organizing your utensils is essential so you can easily find the ones you need when you need them. Begin by sorting your utensils according to their uses. For example, designate one drawer for baking utensils such as spatulas, whisks and measuring cups. Another drawer could be dedicated to cooking utensils, such as knives, spoons and tongs.
Investing in plastic containers or drawer organizers is a great way to store your utensils and keep them from becoming unorganized. Containers come in all shapes and sizes, so you can find something that fits perfectly into your drawers. Also, containers will help keep your utensils from sliding around and becoming jumbled. Once you’ve sorted and stored your utensils in containers, it’s essential to label them. This way, you’ll always know which drawer holds which utensils.
Reap the Rewards of a Clean Kitchen
Spring cleaning is an important task that can help to keep your rooms and their contents in top condition. Clearing and organizing your kitchen can create a more inviting and efficient workspace. With these tips, you can enjoy a spick-and-span kitchen that is ready for use all year round.