
Even if you don’t believe you need one, you’ll want a storage shed since your house never has enough storage. The project does not have to be costly. Building a backyard storage shed yourself yields a better result than hiring a contractor or labor.
Why Buy a Storage Shed?
Table of Contents
Tool, garden, and storage sheds. No matter the name, a shed is a good outdoor storage option. It keeps your backyard clean and provides plenty of room to store bikes, patio furniture in a deck box, outdoor power equipment, and yard tools. With so many types, sizes, and materials, like a robust metal shed, you may choose the right storage solution to optimize your outside area.
How to Build a Backyard Shed?
A well-planned shed is the simplest way to organize your backyard and create a place for bikes, patio furniture, and gardening tools. This article describes how to build a storage garden shed.
Step 1: Determine Your Needs
These questions may help you determine your needs:
- What purpose will your shed serve? Workspace, storage, or something else entirely?
- How would the shed’s placement affect your lot’s moisture content, soil type, slope, fence, trees, property lines, and other features?
- Does looks matter? Is your shed meant to be a garden focal point or to blend in with the style of your home?
- Are there any rules set down by the homeowner’s association in your community regarding the location, size, or design of sheds?
Step 2: Get Building Permission
You need to apply for a construction permit from the local building authority before you can build anything on your land, even a shed. The zoning board, health department, and inland wetlands commission approval is probably also required. In many places, the building department won’t even look at your application until you’ve had clearance from these other organizations. Apply for the construction permission after completing the required paperwork and obtaining all essential approvals. Don’t forget to include a set of shed blueprints to expedite the procedure.
Step 3: Create a Solid Foundation
A sturdy, square foundation is necessary for any backyard storage shed, including a plastic shed, regardless of whether you construct it or purchase a pre-fab kit. The good news is that constructing a foundation, even for a deck box, requires patience to plan and complete the task correctly; you don’t need sophisticated equipment, a large budget, or specialized expertise. Read this article to learn every step in designing and building a foundation for a storage shed.
Two basic foundation types exist for small to medium-sized sheds:
- On-Grade Foundation: Above the Earth is an on-grade foundation. It works best on flat, firm soil and may be as easy and affordable as a frame made of pressure-treated wood or concrete pavers.
- Permanent Foundation: This structure is made of a frame made of pressure-treated wood and several concrete piers that reach below the frost line. Although it takes more work to build, this type of footing is lasting and perfect for places in Canada where frost heave is a problem, especially if you’re considering a metal shed.
A concrete slab, the third kind of foundation, is a level slab of concrete poured straight onto the ground. It may move in the winter when the ground freezes, but it works well for bigger constructions on level sites. Slab foundations are one option for you. Speak with a concrete contractor about less-prone-to-freeze/thaw construction materials and procedures, particularly if installing a plastic shed.
Step 4: Installing shed
- Unpack and Arrange: Unpack the shed kit and arrange every component. Verify that nothing is missing by comparing it to the list that is supplied.
- Assemble the Floor Frame: Begin by putting the floor frame together in accordance with the instructions. Put your shed straight on the prepared foundation if it doesn’t have a floor.
- Construct the Walls: Install the wall coverings. Interlocking panels make installation of most plastic and metal shed simple. Make sure they are safe and in the right alignment.
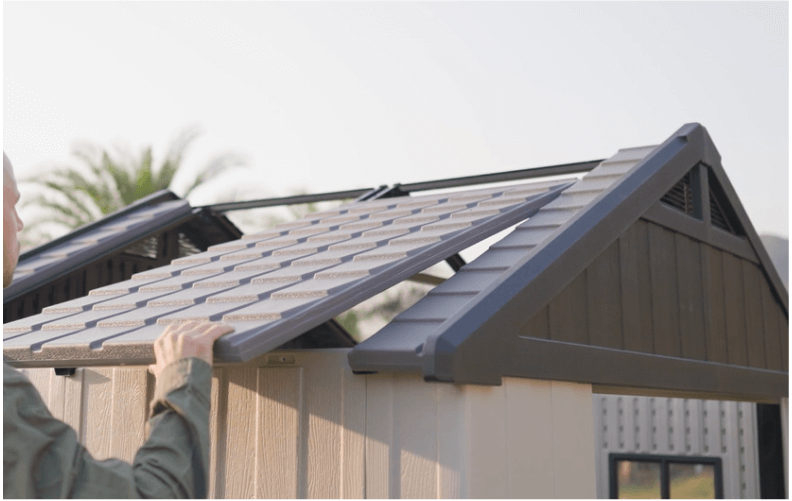
- Install the Roof: Tighten the Roof Panels with Care. Verify that they are securely fastened to avoid water leaks.
- Secure Windows and Doors: Install any windows and doors. Verify whether they shut and open smoothly.
Step 5: Finish the Exterior
- Adhere to the manufacturer’s instructions for proper door installation.
- Install the window following the manufacturer’s instructions.
- Install the ornamental trim outside before the siding.
- Install the vinyl siding.
- Attach the metal fascia after installing the soffit moldings.
- Seal any openings and windows and other areas where water could sneak through with caulk.
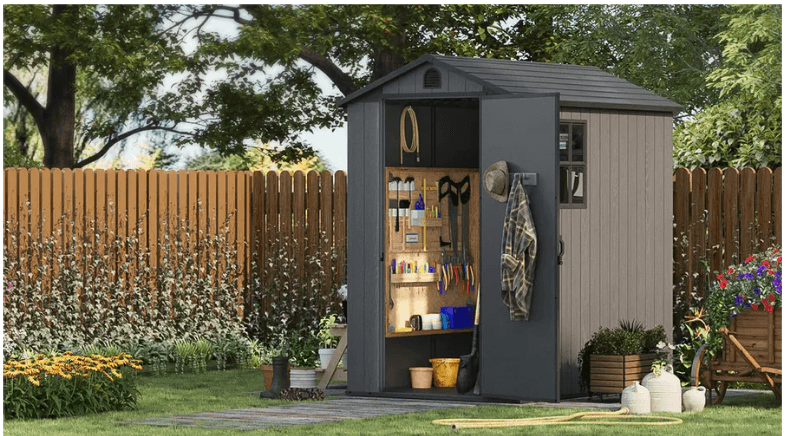
Step 6: Make the Most of Your Shed’s Functionality
Workbenches, shelving, and wall-mounted storage can make any outdoor shed more functional and storage-friendly. Buying these things lets you store tools and equipment off the ground, saving space. By hanging lawnmowers and hedge trimmers on the wall, you can make room for a new snow blower.
Step 7: Final Touches
You may want to add finishing touches to your shed. You can add windows or custom doors to your kit or concept for a modern, tailored look. Paintable sheds, like wooden ones, can be painted or left in natural wood colors. You can also dye or oil the wooden shed to preserve its color and protect it from the elements and heat.
Conclusion
Remember that the shed you just built isn’t just for looks. Keep your yard-related supplies there to maximize the effort you put into creating the shed. Take pride in a well-done job, and know your new shed will serve you well for many years.