
We review the different types of plaster that can be made to finish the construction of a wall. What functions they fulfill and when to use each one.
All walls require a series of layers of plaster to complete their construction. Each of them fulfills certain functions and must be developed and applied in different ways. We have prepared a simple and practical guide for you to know the types of plaster that exist and how to prepare and apply them.
Different types of plaster: which one to use and why
Table of Contents
The different layers of plaster must be done in a precise way and applied on the wall in a specific order. Let’s see when to apply each and how to prepare them:
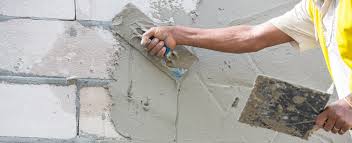
Water-repellent plaster: whipped waterproof
This is the first layer of plaster. It is applied on the outer face of the wall and has the function of isolating the wall from the external humidity caused by rain, dew and ambient humidity.
To be effective, it must extend seamlessly from the horizontal insulating layer that has the water-repellent box of the foundation until it meets the material that waterproofs the roof . It is a very thin plaster (between 5 and 7 mm), so it does not hide irregularities.
When applying, the mason spoon should be loaded, the mixture forcefully thrown against the wall and distributed using the same spoon. The materials to be used to make the water-repellent plaster mix are the following:
- 3 buckets of fine sand (sifted).
- 1 cement bucket (sifted).
- Water repellent that is prepared by mixing.
- 10lts of clean water.
- 1 kg of water-repellent additive product (Sika, Ceresita or similar).
If this layer is well executed, it is likely that you do not have problems of water seepage through the walls and you will not have to face a frequent problem, which is to paint a wall with humidity.
Thick plaster
Thick plaster is that which is placed on the inside of the wall directly on the used brick or masonry (concrete block, industrial blocks, ceramic brick, etc.) or on the waterproof plaster on the outside of a wall.
Its basic function is to rebuild the plane of the wall and plumb it as a base for the final finish. From its placement, any minor imperfections in the alignment of the masonry or the material that was used as a partition between structures can be disguised.
For its application, a simple procedure must be followed.
- First, a series of nails is tacked into the wall, to which four threads will be tied parallel to the wall, forming a rectangle. This will generate a virtual plane two centimeters from the wall, which will be the final plane of the future plaster.
- Next the girdles should be raised. To do this, the upper thread is taken as a guide and, following that lead, wooden rectangles called bolines are tacked with a mortar mixture. In this way, the surface of the strip will remain as a reference for the future surface of the plaster.
- When the strips are well plumb, it’s time to start applying the plaster. The first step for this stage is to wet the wall well. In this way, the bricks will be wet and will not absorb the water in the mixture, something that would take away a good part of its qualities.
- Using a mason spoon, the cloths between strips should be filled with the plaster mixture until reaching the slab or deck. To distribute the material the spoon is used like a spatula.
- Once the mixture begins to set (which means “dry”), a construction ruler is taken and the applied material is smoothed out by supporting the ruler on the strips and using them as a guide.
Different finishes of thick plaster
If the wall you are plastering will later have a layer of fine plaster or you plan to finish the wall and paint it later, you should take the trowel, moisten it and pass it with circular movements.
Then you will have to take a notched trowel to “comb” the plaster, generating small grooves in which the thin plaster layer will then “grab”.
If this plaster will be the base for subsequent ceramic or similar coatings, you will have to take the notched trowel and carry out the same procedure. But if you are going to apply that coating using a special glue premix, you will not need to do the “styling”.
The materials to be used to make the thick plaster mix are the following:
- 1 ½ bucket of lime.
- ¼ cement.
- 3 buckets of sand.
- Water (this should be incorporated little by little until you get a homogeneous result and not so thick).
Fine plaster
It is the layer that follows the thick plaster, which can be used both for the exterior face of a wall and for interior walls. It is a very thin layer of mixture, only a few millimeters thick, which must be perfectly adhered to the thick plaster so that it does not fall, crack or jump
It is the last application that is made so that the wall is very smooth and can be painted with different colors of interior paints.
With the advancement of the use of exterior cladding materials such as Tarquini-type plastic plaster , it is no longer common for fine plaster to be applied to the exterior of a home. But the interior walls must always be perfectly smooth, so it is necessary to work with this type of plaster there.
The materials to be used for this are the following:
- 3 measures of sand.
- 1/8 cement.
- 1 air lime.
- Water.
Plastic plaster
Although its inclusion in the construction universe is relatively recent, textured plaster or plastic coating is already an undisputed part of the menu of options to give color and protection to the exterior of a house.
Exterior coatings replace fine bleaching and are placed directly over coarse. It is a product that is ready to be applied on a wide variety of surfaces, both indoors and outdoors.
It is long-lasting, requires little maintenance and can be applied generating a striped render of different textures: they can be fine, medium or coarse grain and can be finished horizontally or vertically, depending on how it is applied.